This guide is written by Carlisle. Feel free to message me on Slack if you have any questions or need help! If I don't respond you can also ask in #stardance-help.
A GitHub repository is the home for your project's code. Stardance uses it to help reviewers and voters see what you built, how it changed over time, and whether the source is public enough for someone else to run.
First of all, what is Git, and why do we need it? To start, Git and Github are two different things:
- Git is a tool for managing your code projects. You store each of your projects in a repository, and whenever you make an update to your project, you can "commit" the changes to the repository. Git will keep a history of every change you have made, so that in case your update accidentally broke something, you can easily undo your changes!
- Github is a free service that allows you to host your Git repository -- which has all of your code -- in the cloud, which makes it easy to access your code from anywhere. It allows others to check out your project, makes sharing and collaborating on projects much easier, and serves as a backup in case your computer breaks and you lose all of your code (This has happened to me 😞... back up your stuff!) Git is used all the time by programmers, and using it is an essential skill to learn.
To setup Github:
-
First up... Make an account! Go to github.com and sign up for an account (it's free, don't worry).
-
Now, create a new repository, like so:
.png)
- Choose a name for your repository, and a short description. You can change these later.
- Set visibility to public and add README to on.
- If you don't know what the "Add .gitignore" option is, then just leave it set to "None".
- And lastly, you can optionally set a license. You can use any license you want, or none at all, but do know that if you don't set a license, then nobody is allowed to use and improve upon your code in their own projects. I personally like to use an open source license, such as the MIT License, which allows others to use my code in their projects if they wish.

- Now copy the URL of your repository, you will need this soon!

So you have a repository on Github, but you also need to have Git installed on your computer. To install it, follow the instructions for your operating system:
Windows
To install the desktop app (recommended):
- Visit the download page for GitHub Desktop.
- Click Download now and then Download for Windows.
- Double-click the GitHub Desktop file that you downloaded to start the installation. It is probably in your computer's
Downloadsfolder. - GitHub Desktop will launch after the installation is complete.
To install only the command line version (for advanced users):
Follow the instructions here
MacOS
To install the desktop app (recommended):
- Visit the download page for GitHub Desktop.
- Click Download now and then Download for MacOS.
- Double-click the GitHub Desktop file that you downloaded to unzip it. It is probably in your computer's
Downloadsfolder. - Double click the unzipped Github Desktop file to start the installation.
- Github Desktop will launch after the installation is complete.
To install only the command line version (for advanced users):
Follow the instructions here
Linux
To install the desktop app (recommended):
Unfortunately, Github Desktop is only available on Windows and MacOS, so you will have to install and use Git through the terminal.
First, check to see if it is already installed:
- Open the terminal.
- Run this command:
git --version. If it outputs something likegit version 2.54.0(the number may be different), then it is installed. If it instead outputs something likeUnknown command: git, then it is not installed.
To install Git, go to this site and find the command for the distribution of Linux you are using, and run the command in the terminal. Do not include the hashtag (#) when you type the command. It may ask you for your computer password.
Clone your repository
After you've installed Git, you need to clone the repository onto your computer. This will let you do the coding in the local repository (the copy on your computer), and then synchronize your code onto the repository on Github (this action is referred to as "pushing" your code to Github) whenever you make a significant change to your code!
If you are using the Github Desktop app:
- Open the app.
- Sign in to Github and click the authorize Github Desktop button.
- In the app, you should see your repository on the left side of the screen. Click on it, then click the clone button.
If you are using Git through the terminal:
Open the terminal app.
In the terminal, type git clone <URL of Github repository>. Obviously, replace <URL of Github repository> with the URL of your repository, which you copied earlier. Press Enter ↩, and Git will clone the repository onto your computer.
💡Tip: Having trouble pasting the URL? Try right clicking and then clicking the paste option, or try doing Control+Shift+V instead of Control+V.
Committing your code
You should put all of your code in your repository. Find your repository folder by clicking the Show in File Explorer/Finder button in Github Desktop.
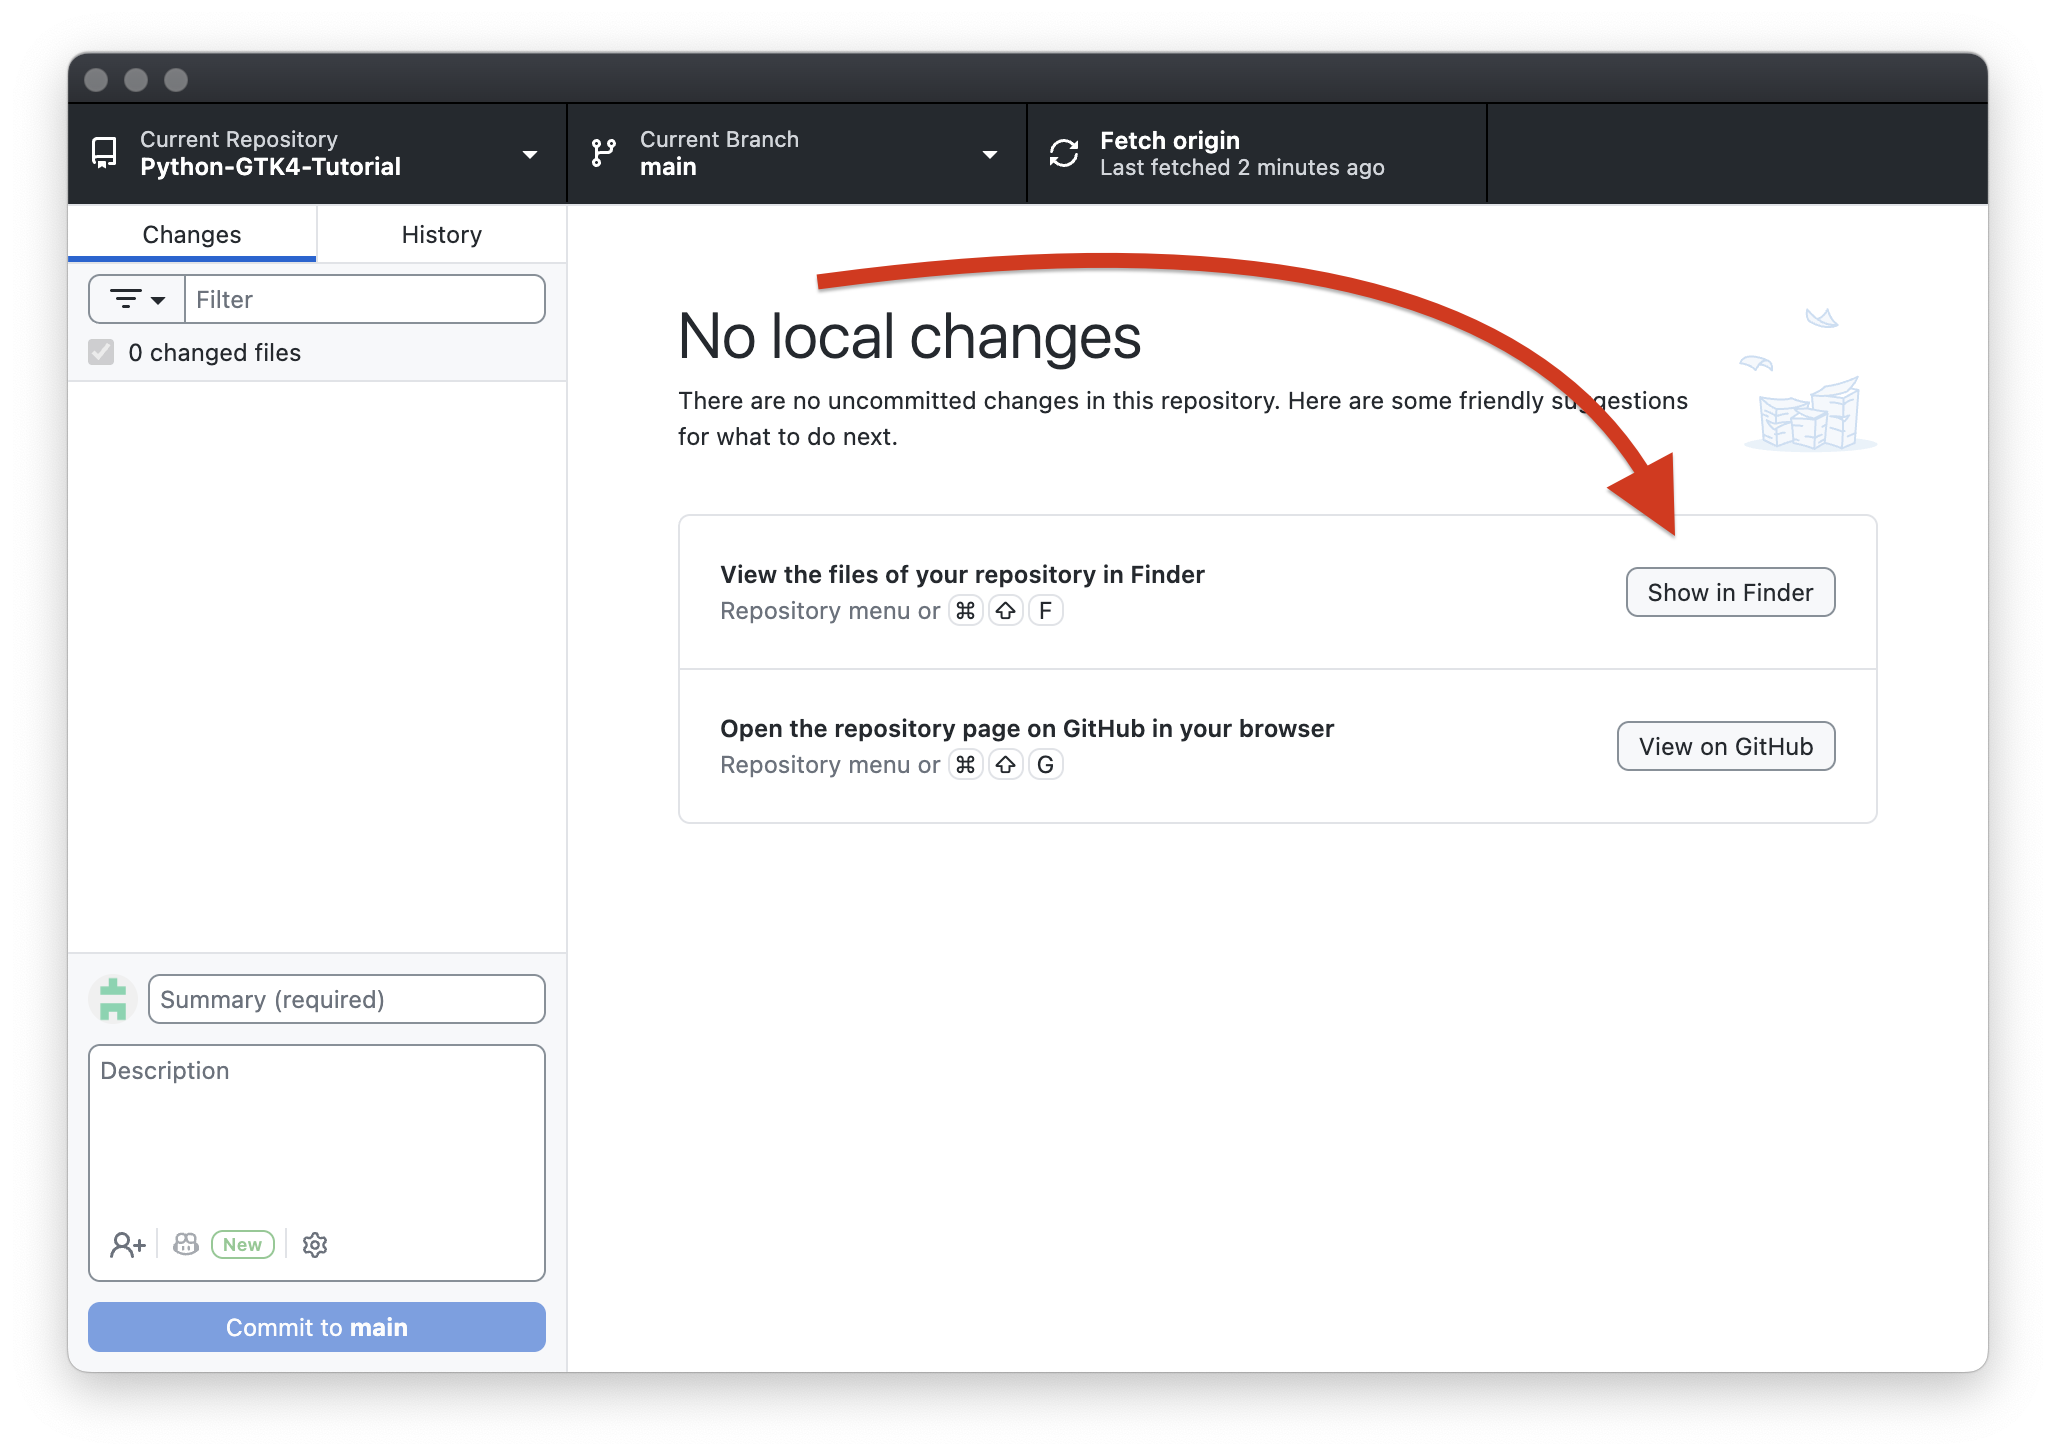
That will open your repository folder in your file browser. If you have already started coding your project, move your code into that folder. If you haven't started yet, then put your code in there when you do start!
Whenever you make an update to your project, you should "commit" your code. Committing your code is basically making a progress checkpoint. It's generally recommended to commit around once per hour. These commits, or "checkpoints", are useful because they keep a history of your progress! (They also help us verify that you aren't trying to cheat the system for free stuff!)
To commit your code using Github Desktop
Look for the sidebar on the left side of the Github Desktop app. It will show you all the files in your repository that are either new, edited, or deleted. It won't show files that haven't changed since your last commit. You can click on the files to see what exactly you changed in the file.
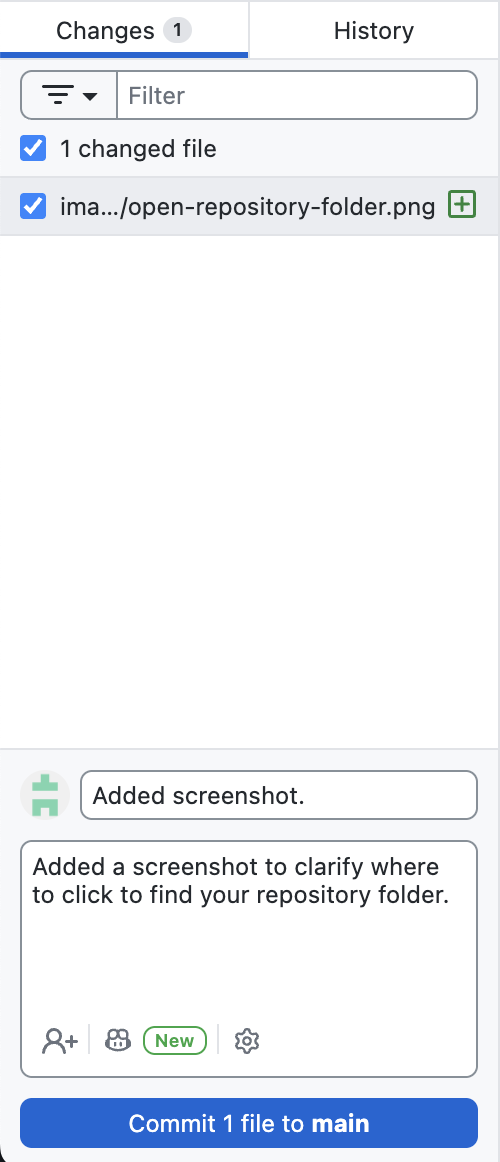
Make sure all the files are selected (have a checkmark beside them). Then in the little textbox below, put a message summarizing what you changed. If you want to put a longer explanation, put it in the larger textbox right below that. Then press the commit button at the bottom!
You've committed your changes, but the commit is only on your computer, not on the Github website. To upload it to Github (this action is referred to as "pushing" your code), click the Push origin button at the top of the app. That's it!
If you want to see a history of all of your commits/changes, check out the history tab at the top of the sidebar. It will show you every single commit you have ever made, and what you changed in each one!
Committing your code using the terminal instead of Github Desktop
Make sure you put all of your code into the repository folder.
Navigate into the repository folder in your terminal. Then:
- Type
git status. This will show you all the changes that you haven't committed yet. - To add the files that you changed to the next commit, use
git add <file>, replacing<file>with the name of the file you want to add. You can add multiple files at once, just put a space between each one. If you want to add all of the files, dogit add .. - Do
git statusagain to make sure everything looks right. - To commit, do
git commit -m "Summary of changes"replacingSummary of changeswith, well, a summary of your changes. If you want to also add a longer description going into more detail about the changes, dogit commit -m "Summary of changes" -m "Longer description of changes"instead. - To upload the changes to the Github Website (the "remote repository"), do
git push. It may ask for your Github credentials.
Link it to Stardance
Open your project on Stardance, choose Edit project, and paste the root repository URL into the GitHub URL field.
Use this shape:
https://github.com/YOUR_USERNAME/YOUR_REPO
Do not use URLs that end in .git, point to /tree/main, or point to one specific file.
Before you ship
- Make sure the repo is public.
- Commit meaningful chunks of work as you build.
- Keep secrets, API keys, and .env files out of git.
- Add a README that explains what the project is and how to run it.